The Logo Grid Blueprint: How to Construct Geometric Logos in Adobe Illustrator

Quick Answer: A logo construction grid is a structured framework of intersecting lines, curves, and angles that guides the placement of vector paths. To construct a geometric logo grid in Adobe Illustrator, configure your workspace for sub-pixel snapping by setting the custom gridline tracking to 100px with 10 subdivisions, enabling Smart Guides, and using key tools like the Polar Grid Tool, the Ellipse Tool, and the Shape Builder Tool to draft and clean up your geometry. Snapping anchor points directly to mathematical intersections guarantees optical balance and resolution-scaling consistency.
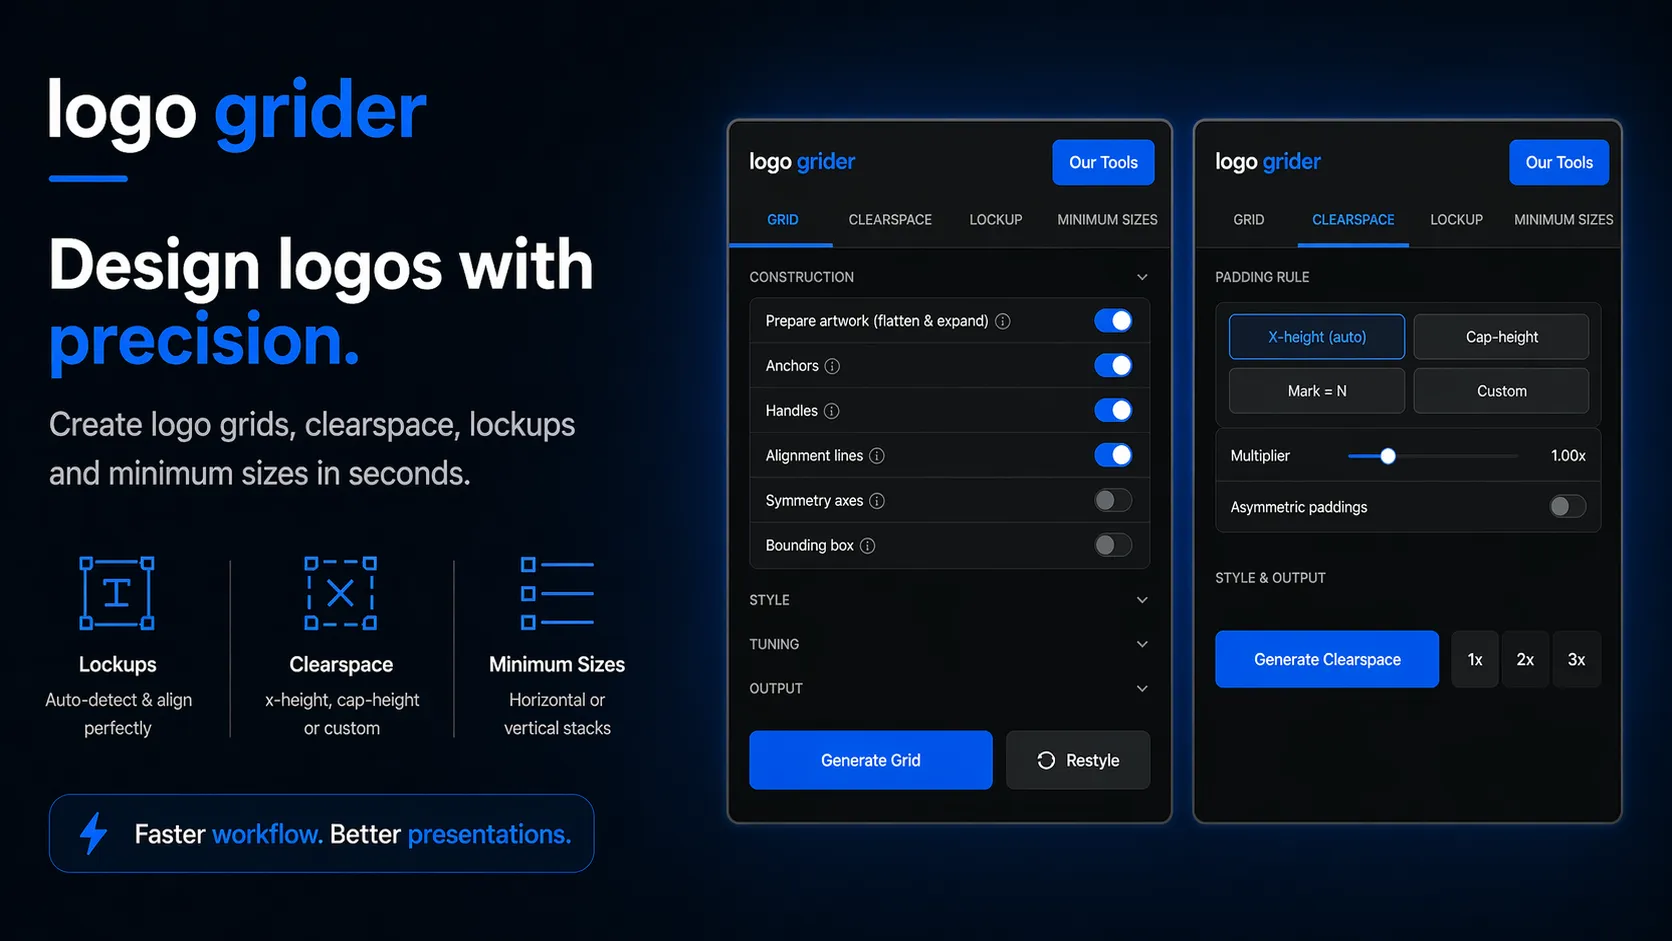
[!TIP] Workflow Tip: Setting up circles, tangent angles, and offset vectors manually is time-consuming and introduces alignment drift. You can automate this entire workflow using the Logo Grider extension panel for Adobe Illustrator, generating construction geometry, grids, and clearspace rules with a single click.
1. Introduction
When branding assets scale across digital screens, tiny discrepancies in vector coordinates compile into noticeable flaws. An anchor point that sits on a fraction of a pixel will blur at small resolutions, while an unaligned curve will break optical balance when scaled up to a billboard. Freehand drafting can feel expressive during the initial sketching phase, but corporate identity demands rigorous precision.
Establishing a solid, mathematical construction grid ensures that every curve, intersection, and anchor point in your mark is geometrically aligned. A structured design system makes it possible to maintain perfect visual weights, keep file weights minimal, and export clean SVGs that render crisp rendering on high-density screens. This blueprint details the exact settings, formulas, and tools required to build, draw over, and export professional geometric grids within Adobe Illustrator.
2. Core Explanation of Geometric Grid Systems
Geometric logos rely on proportion systems to feel balanced. The most successful brandmarks in design history use specific visual intervals—often derived from the Golden Ratio ($\Phi \approx 1.618$) or custom root systems (such as $\sqrt{2} \approx 1.414$)—to scale their components. Instead of adjusting the size of shapes by eye, you should establish a set of modular visual guides that define structural heights, widths, and curves.
Consider a concentric circle matrix where the radius of each subsequent circle is multiplied by $\Phi$:
$$r_{n} = r_1 \times \Phi^{n-1}$$
This mathematical relationship ensures that the visual progression between nested elements feels natural and harmonious to the human eye. Snapping arcs to these precise radii removes subjectivity and guarantees that the curvature remains mathematically consistent across all applications.
Beyond nested circles, a structural layout grid uses angles (most commonly $30^{\circ}$, $45^{\circ}$, and $60^{\circ}$) to establish diagonal flows. These angles align with the eye’s natural scanning habits and provide clean guides for vector terminals and slopes. When these circles and diagonal paths intersect, they form intersection nodes. These nodes are the exact coordinates where your vector anchors must snap.
3. Step-by-Step Grid Construction Process
To construct a high-precision grid without layout drift, follow these steps to set up your environment, draft the layout structure, and align your paths.
Step 1: Configure Your Workspace and Snapping Settings
Before drawing a single line, you must configure Adobe Illustrator’s snapping engines to align to exact integer pixels and coordinates.
- Open your preferences panel by pressing Ctrl + K (Windows) or Cmd + K (macOS). Select the Guides & Grid tab.
- In the Grid section, set Gridline every to
100pxand Subdivisions to10. This creates a clean main tracking line every 10px, allowing you to snap anchors precisely. - Enable visual grids by navigating to View > Show Grid or pressing Ctrl + ” (Windows) or Cmd + ” (macOS).
- Turn on snapping: Select View > Snap to Grid or press Ctrl + Shift + ” (Windows) or Cmd + Shift + ” (macOS).
- Turn on Smart Guides by selecting View > Smart Guides or pressing Ctrl + U (Windows) or Cmd + U (macOS). Ensure Snap to Point is also checked.
Step 2: Establish the Proportional Concentric Circle Matrix
Using nested circles creates harmonic curved vectors.
- Select the Ellipse Tool by pressing L. Click once on the center of your artboard.
- Set the dimensions to
100pxwidth and100pxheight, then press Enter. - Duplicate this ellipse: Copy the path with Ctrl + C (Windows) or Cmd + C (macOS), then paste it directly in front using Ctrl + F (Windows) or Cmd + F (macOS).
- Open the Transform Panel (Window > Transform). In the width and height boxes, multiply the current value by typing
* 1.618and press Enter. The dimensions will update to161.8px. - Repeat this process to generate your concentric golden circles set:
100px,161.8px,261.8px,423.6px, and685.4px. - Select all of these concentric ellipses, group them with Ctrl + G (Windows) or Cmd + G (macOS), and convert them to non-printing guides by pressing Ctrl + 5 (Windows) or Cmd + 5 (macOS) (or choosing View > Guides > Make Guides).
Step 3: Draw Axis and Angle Vectors
Next, build structural lines to guide the slopes of the logo mark.
- Select the Line Segment Tool by pressing ****.
- Draw a vertical axis line passing through the center of your concentric guides, and a horizontal axis line. Hold down Shift while drawing to lock the lines to exactly $90^{\circ}$ and $180^{\circ}$.
- Select the Rotate Tool by pressing R. Hold down Alt (Windows) or Option (macOS) and click on the center intersection node of the grid.
- Enter
30degrees in the angle prompt and click Copy. This creates a $30^{\circ}$ diagonal line. Repeat to create $45^{\circ}$ and $60^{\circ}$ offsets. - Select these lines and press Ctrl + 5 (Windows) or Cmd + 5 (macOS) to convert them to guides. Lock your guides by selecting View > Guides > Lock Guides (Ctrl + Alt + ; on Windows or Cmd + Option + ; on macOS).
Step 4: Construct the Vector Paths over the Guides
Now draft the actual logo shapes over your locked guidelines.
- Select the Pen Tool by pressing P.
- Hover over the intersection nodes of your concentric circle guides and diagonal lines. The Smart Guides will display the label
intersect. - Click to place your anchor points directly on these intersection coordinates.
- If you need to draw matching parallel curves, do not scale duplicates, which distorts stroke widths. Instead, select your path and choose Object > Path > Offset Path, entering the exact margin width (e.g.
20px). - Keep bezier handles restricted to $0^{\circ}$, $45^{\circ}$, and $90^{\circ}$ angles by holding down Shift while dragging handles. This maintains smooth curvature continuity.
Step 5: Path Merge and Anchor Points Cleanup
Overlapping circle segments must be trimmed to keep the final compound paths clean.
- Select all the active vector shapes you drew over the guides using the Selection Tool (V).
- Select the Shape Builder Tool by pressing Shift + M.
- Hold down Alt (Windows) or Option (macOS) and drag your cursor over the excess outer and inner guide paths to delete them.
- Drag your cursor across adjacent shapes to merge them into solid compound vectors.
- Clean up redundant anchor points by opening Object > Path > Simplify. This streamlines the math of your shapes and keeps SVG file sizes tiny.
4. Real-World Application and Case Studies
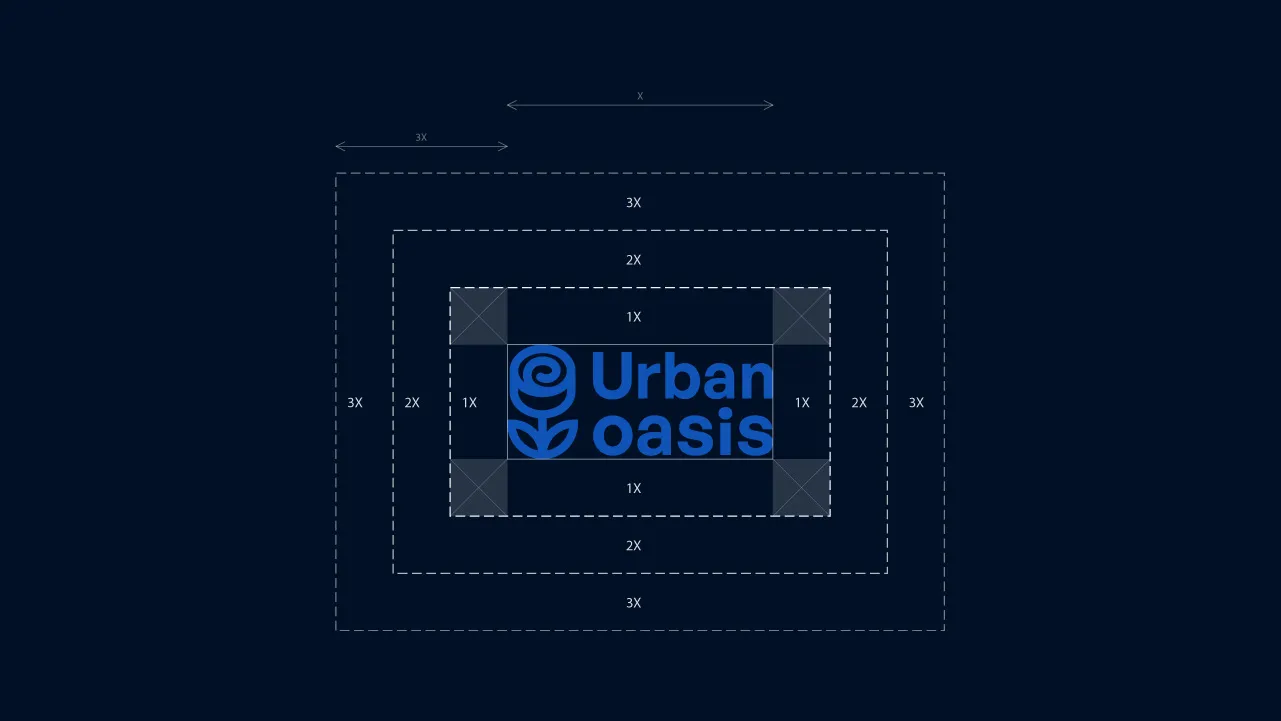
When delivering a brand identity system to a corporate client, you must provide a clean construction blueprint page in the official brand guidelines book. This blueprint showcases the geometric balance of your mark, confirming the design’s quality and mathematical rigor.
For example, when preparing deliverables for a scaling fintech startup, developers may need to render the brand mark at small dimensions inside mobile application headers, as well as on high-contrast metal credit cards. A logo built without a mathematical grid often shows visible “pixel snapping” issues—where vector edges fail to align cleanly with the screen grid, leading to blurry edges.
By building the logo on a structured pixel-aligned layout and utilizing clear x-height calculations, the brand mark remains perfectly crisp at 16px height inside digital headers, and preserves its curvature at large scale on signage.
5. Common Grid Construction Mistakes
Even seasoned identity designers make errors when setting up grid coordinates:
- Snap-Drift from Non-Integer Coordinates: Failing to align the center point of the circle matrix to integer pixel values (e.g. placing the center at
X: 450.3pxinstead ofX: 450px). This introduces fractional coordinates to all snapped shapes, causing anti-aliasing issues. - Scaling Copies Instead of Offsetting: Using copy-paste-scale to create concentric rings. If you scale a ring with a
10pxstroke by 150%, the stroke width becomes15px. Always use Object > Path > Offset Path to maintain stroke consistency. - Leaving Stray Points After Trimming: Trimming overlapping paths with the Pathfinder tool can leave hidden, zero-length paths and single anchor points. Always run Object > Path > Clean Up to remove stray points and empty text fields.
- Over-complicating the Guide Grid: Adding hundreds of lines that do not relate to the logo’s geometry. Keep the grid simple, showing only the vectors that define the final shapes.
6. Tools & Workflow Recommendations
Constructing concentric circles, relative angles, and safety zones manually takes time and is prone to human error. Using a dedicated panels library dramatically speeds up vector asset packaging.
To build geometric grids directly inside your active canvas, you can use the Logo Grider extension panel for Adobe Illustrator. Instead of drawing concentric circles and custom offset paths by hand, Logo Grider lets you generate precise geometry lines, calculate relative offsets, and build safety zones with a single click. This guarantees that your vector shapes snap cleanly to integer coordinates, eliminating path drift.
For layout and editorial grids (such as column systems for brand books), you can couple this tool with GridMaster to establish baseline margins and grid overlays across multiple artboards.
7. FAQ
What is the advantage of using a logo construction grid?
A logo construction grid ensures mathematical alignment, visual balance, and clean rendering on digital screens. It eliminates visual guessing, ensuring that all curves, lines, and safety zones scale proportionally.
Should I snap my vectors to the pixel grid or the guide grid?
You should snap to both. By centering your geometric guides on integer pixels, the guide intersections will align with the pixel grid, preventing blurry edges in final exports.
How do I make guides out of drawn vector paths?
Select the drawn paths and press Ctrl + 5 (Windows) or Cmd + 5 (macOS), or select View > Guides > Make Guides from the menu.
How do I remove guides from my document before sending it to a client?
Before handoff, choose View > Guides > Clear Guides to remove guide segments, or hide them with Ctrl + ; (Windows) or Cmd + ; (macOS) so the client only sees the final artwork.
Why does the Shape Builder Tool leave small line segments?
This happens when paths do not intersect completely. Ensure your paths overlap the guides by a tiny margin before running the Shape Builder Tool (Shift + M) to guarantee clean cuts.
8. Conclusion
Constructing geometric logo grids is a fundamental requirement for professional identity design. By aligning curves to relative ratios like the Golden Ratio, establishing custom angle guides, and configuring snapping settings, you create brand marks that look balanced at any scale.
As a next step in packaging your client deliverables, download our Ultimate Brand Guidelines Template to document these geometric rules in an agency-level brand book, and review our guide on How to Calculate Logo Clear Space.
Table of Contents
Recommended Tools
GridMaster
Create precise, professional layouts in seconds. GridMaster is a powerful Adobe Illustrator panel designed to generate column, modular, baseline, and composition grids.
Logo Grider
Build logo grids, clearspace rules, lockups, and minimum size systems in seconds. Logo Grider is a clean, easy-to-use Illustrator panel designed for professional brand designers.
ColorLens
Stop jumping between websites and manual workflows. ColorLens brings palette generation, WCAG contrast checks, image color extraction, and color specification sheet export directly into Adobe Illustrator.
Identity Assets
Bold Brand Guidelines Template
A high-performance landscape layout template built for InDesign, Figma, and Illustrator. Reclaim your design time and deliver agency-level style guides to clients.
Free Brand Guidelines Template
A professional and clean brand guidelines template fully editable in Adobe Illustrator and InDesign. Perfect for freelancers, agencies, and business owners looking to organize brand rules.
Ultimate Brand Guidelines Template
The ultimate 36-page professional brand guidelines template built for Adobe Illustrator, InDesign, and Figma. Streamline your workflow and deliver agency-level brand books.
Glossary Terms
Get New Branding Resources Every Week
Join over 10,000 identity designers who receive our latest curated tutorials, grid templates, checklists, and Illustrator workflow optimizations straight to their inbox.
Zero spam. Unsubscribe with a single click at any time.
Continue Reading
How to Calculate Logo Clear Space: Spacing Ratios and Visual Safety Zones
An in-depth technical guide to calculating logo clear space using relative x-height formulas, measuring bounds, and building safety zone templates in Adobe Illustrator.