
How to Make a Grid in Adobe Illustrator: 3 Practical Methods (Document, Guide & Vector Grids)

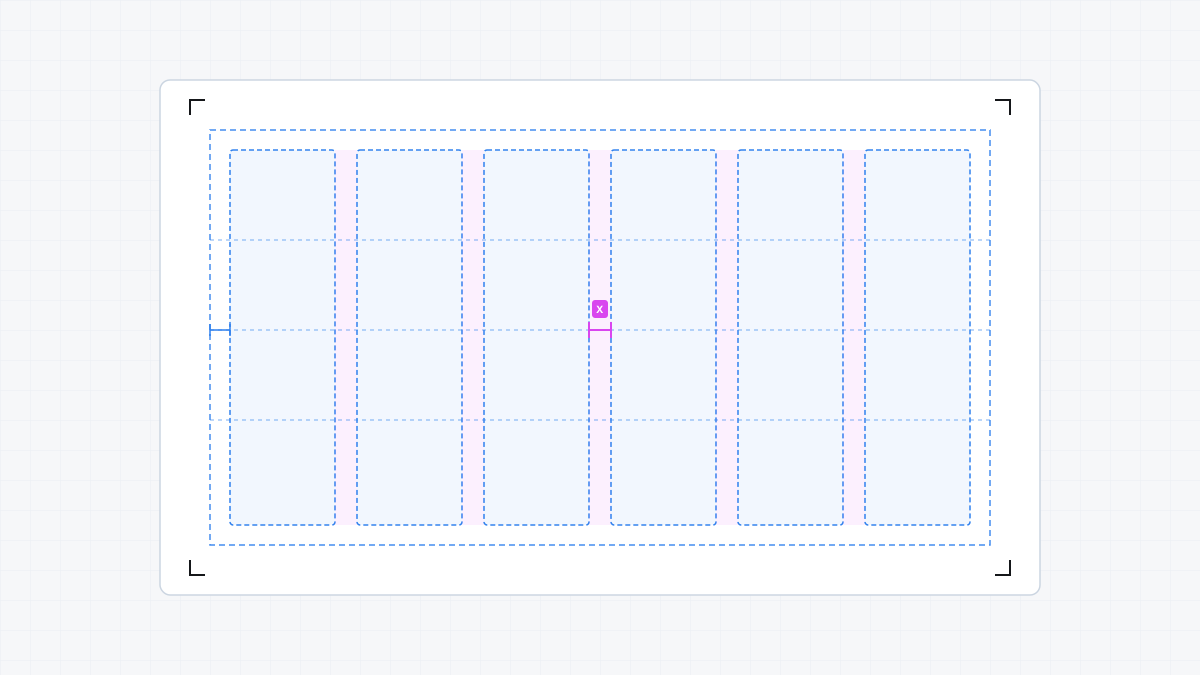
Quick Answer: To make a grid in Adobe Illustrator, select the method that matches your project needs: (1) For a background snapping grid, press Ctrl + ’ (Windows) or Cmd + ’ (macOS) to show the Document Grid, and adjust line spacing via Edit > Preferences > Guides & Grid; (2) For non-printing layout columns and margins, draw a rectangle matching your canvas, go to Object > Path > Split Into Grid…, specify your columns and gutters, then press Ctrl + 5 (Windows) or Cmd + 5 (macOS) to convert the paths into guides; (3) For visible vector line meshes or tables, select the Rectangular Grid Tool (\) and click your artboard.
Workflow Note
Manual grid construction gives you complete control over path geometry and preference coordinates. When you need to generate multi-artboard column layouts, modular matrices, baseline grids, or responsive proportion overlays without manual math, GridMaster generates production-ready guide systems directly on your active Illustrator artboard in seconds. If you are packaging these layout standards for client handoff, you can document your grid specifications directly inside the Ultimate Brand Guidelines Template.
Which Grid Method Do You Need? (Comparison & Core Differences)
One of the most common points of confusion in Adobe Illustrator is that the term “grid” refers to three distinct tools, each built for a different stage of the design process. Choosing the wrong tool leads to frustrating snapping behavior, cluttered workspaces, or vector grid lines that accidentally appear in exported PDF or PNG deliverables.
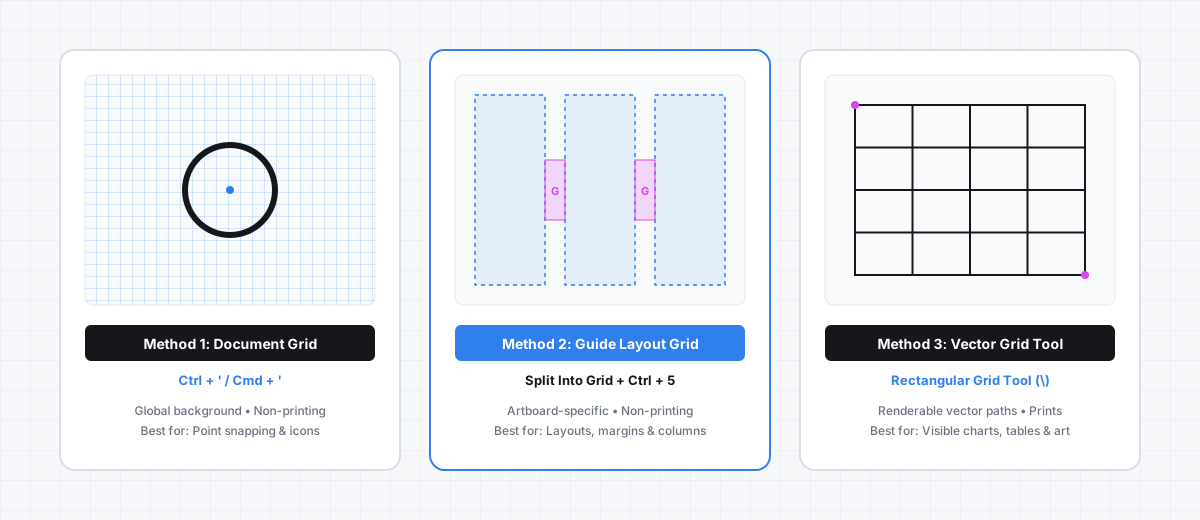
| Grid Type | How It Is Created | Primary Use Case | Output Behavior | Snapping Engine |
|---|---|---|---|---|
| Document Grid | View > Show Grid (Ctrl + ' / Cmd + ') | Vector icon drafting, geometric logos, pixel-perfect UI snapping | Non-printing global canvas overlay | View > Snap to Grid (Ctrl + Shift + ' / Cmd + Shift + ') |
| Guide Layout Grid | Split Into Grid + Make Guides (Ctrl + 5 / Cmd + 5) | Editorial layouts, multi-column brand books, poster margins, web wireframes | Non-printing vector guides tied to specific artboards | View > Smart Guides (Ctrl + U / Cmd + U) or Snap to Point |
| Vector Shape Grid | Rectangular Grid Tool (\) | Visible tables, technical chart backgrounds, isometric matrices, pattern bases | Standard vector paths (renders and prints) | Standard path anchor point snapping |
Understanding this structural distinction allows you to build clean vector artwork without fighting the software.
Method 1: The Document Preference Grid (Background Alignment & Snapping)
The Document Grid is an infinite, non-printing reference matrix that sits behind your artwork across the entire workspace. It is the primary tool for icon designers, geometric mark creators, and vector illustrators who need anchor points to snap to consistent numerical increments.
Turning On the Document Grid
To display the document grid on your canvas:
- Navigate to View > Show Grid in the top application menu, or use the keyboard shortcut Ctrl + ’ (Windows) or Cmd + ’ (macOS).
- To enable anchor point and bounding box snapping to the grid lines, navigate to View > Snap to Grid or press Ctrl + Shift + ’ (Windows) or Cmd + Shift + ’ (macOS).
- If you want the grid lines to sit in front of solid vector fills rather than behind them, open your preferences and uncheck Grids in Back.
Customizing Grid Size and Subdivisions in Preferences
The default Illustrator grid settings rarely match the exact spacing needed for modern branding or interface systems. You can configure exact intervals in the Preferences panel:
- Open the Preferences dialog by pressing Ctrl + K (Windows) or Cmd + K (macOS), or navigate to Edit > Preferences > Guides & Grid (Windows) / Illustrator > Settings > Guides & Grid (macOS).
- Locate the Grid section.
- Configure the Gridline every input value. This defines the major spacing interval for primary grid lines.
- Configure the Subdivisions input value. This divides the major interval into smaller, evenly spaced sub-tracks.
- Choose a custom line color (such as Light Blue
#2F80EDor Medium Gray) and style (Continuous Lines vs. Dots) to reduce eye fatigue during long production sessions.
Practical Document Grid Settings for Real Workflows
Instead of guessing values, use standard mathematical intervals tailored to your specific design output:
- 10px Decimal / Vector Icon System:
- Gridline every:
100px - Subdivisions:
10 - Resulting interval: Minor gridline snaps every
10px, with a bold major line every100px.
- Gridline every:
- 8-Point Digital UI / App Icon System:
- Gridline every:
64px - Subdivisions:
8 - Resulting interval: Minor gridline snaps precisely at
8pxincrements ($64 / 8 = 8\text{px}$), matching standard digital design tokens.
- Gridline every:
- Metric Print / Packaging Layout System:
- Gridline every:
50mm - Subdivisions:
5(or10) - Resulting interval: Subdivisions snap every
10mm(or5mm) for physical print accuracy.
- Gridline every:
Method 2: Custom Layout Guide Grids (Columns, Rows & Gutters)
When building brand identity guideline pages, posters, editorial spreads, or web landing page mockups, a global background grid is not enough. You need artboard-specific column guides with controlled margins and gutter spacing.
Illustrator does not include a standalone “New Guide Layout” dialog like InDesign, but you can build a mathematically perfect guide system in less than a minute using path operations.
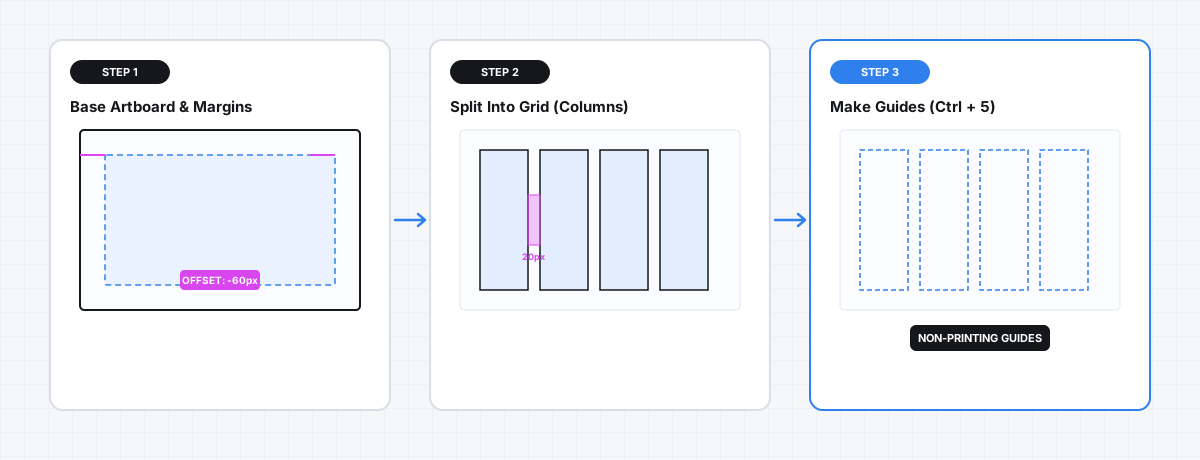
Step 1: Draw the Artboard Bounding Box
- Select the Rectangle Tool (M).
- Click once on your active artboard to open the rectangle dimensions dialog.
- Enter the exact width and height of your artboard (for example,
1920pxby1080pxfor a 16:9 presentation slide, or210mmby297mmfor an A4 print sheet). Press Enter. - Open the Align Panel (Window > Align). Ensure Align To is set to Align to Artboard, then click Horizontal Align Center and Vertical Align Center to center the rectangle over your canvas.
Step 2: Inset Margins with Offset Path
To create equal outer margins around your design area:
- Keep the rectangle selected and go to Object > Path > Offset Path…
- Enter a negative value matching your desired page margin. For example, enter
-60pxfor a comfortable digital margin, or-15mmfor a print page margin. - Set Joins to Miter with a Miter limit of
4. - Click OK.
- Select and delete the original outer rectangle, leaving the newly created inner margin box selected.
Step 3: Divide into Columns and Gutters with Split Into Grid
- With the inner margin box selected, navigate to Object > Path > Split Into Grid…
- In the dialog box, check the Preview checkbox in the lower-left corner so you can see changes in real time.
- Under the Columns section:
- Set Number to your desired column count (e.g.,
12for a universal 12-column grid,6for a presentation deck, or4for a catalog layout). - Enter your desired Gutter value (e.g.,
20pxor5mm). Illustrator automatically calculates the resulting individual column width ($W_c$) based on the formula: $$W_c = \frac{W_{\text{inner}} - (N - 1) \times G}{N}$$ where $W_{\text{inner}}$ is the margin box width, $N$ is the number of columns, and $G$ is the gutter width.
- Set Number to your desired column count (e.g.,
- Under the Rows section (optional for modular grids):
- Set Number to your row count (e.g.,
4or8rows) and enter your row Gutter.
- Set Number to your row count (e.g.,
- Click OK. Illustrator will convert your single rectangle into a set of individual vector boxes.
Step 4: Convert Paths to Non-Printing Guides
- Select all the generated column and row rectangles (Ctrl + A or drag a marquee selection).
- Convert the vector paths into non-printing guides by navigating to View > Guides > Make Guides, or by pressing Ctrl + 5 (Windows) or Cmd + 5 (macOS).
- Notice that the black vector paths immediately transform into light blue or cyan guide lines. These lines will remain visible while designing but will never appear when exporting to PNG, JPEG, SVG, or print PDF.
- Lock your guides to prevent accidental movement: press Ctrl + Alt + ; (Windows) or Cmd + Option + ; (macOS), or select View > Guides > Lock Guides.
Method 3: The Rectangular Grid Tool (Visible Vector Meshes & Tables)
When you need an actual vector shape grid—such as for a data table, an architectural coordinate grid, an isometric drafting foundation, or a visible background pattern—use the dedicated Rectangular Grid Tool.
Locating the Tool and Opening the Options Dialog
- In the Tools panel on the left, locate the Line Segment Tool (\).
- Click and hold the Line Segment Tool icon to reveal the nested flyout menu.
- Select the Rectangular Grid Tool.
- Click once anywhere on your artboard. This opens the Rectangular Grid Tool Options dialog:
- Default Size: Set the overall Width and Height of the grid (e.g.,
800pxby600px). - Horizontal Dividers: Set the Number of horizontal dividers (which creates $N + 1$ rows). Use the Skew slider if you need logarithmic or perspective distribution.
- Vertical Dividers: Set the Number of vertical dividers (which creates $N + 1$ columns).
- Use Outside Rectangle As Frame: Check this box to keep an outer border stroke around your grid cells.
- Fill Grid: Check this box if you want the grid filled with the active foreground color.
- Default Size: Set the overall Width and Height of the grid (e.g.,
- Click OK to generate the vector grid object on your canvas.
Interactive Keyboard Shortcuts While Dragging
Instead of typing numbers into a dialog box, you can dynamically create and adjust a vector grid on the fly using live keyboard shortcuts:
- Select the Rectangular Grid Tool.
- Click and begin dragging across your artboard without releasing the mouse button.
- While continuing to hold down the mouse button:
- Press the Up Arrow ($\uparrow$) key to add horizontal rows.
- Press the Down Arrow ($\downarrow$) key to remove horizontal rows.
- Press the Right Arrow ($\rightarrow$) key to add vertical columns.
- Press the Left Arrow ($\leftarrow$) key to remove vertical columns.
- Press F or V to skew the vertical dividers, or C or X to skew horizontal dividers.
- Hold Shift to constrain the overall grid to a 1:1 square aspect ratio.
- Hold Alt (Windows) or Option (macOS) to draw the grid outward from its center point.
- Release the mouse button once your grid reaches the desired dimensions and column density.
How to Edit, Resize, or Release an Existing Grid
Designs evolve as content is placed. Here is how to adjust each grid type without starting over from scratch:
Editing Document Grid Preferences
To modify background gridline density or change color during an active project:
- Press Ctrl + K (Windows) or Cmd + K (macOS) to open Preferences.
- Navigate to Guides & Grid.
- Update the Gridline every or Subdivisions fields.
- Click OK. The background grid updates immediately across all open artboards without altering existing artwork layers.
Releasing and Resizing Guide Grids
If you constructed a column guide grid using Method 2 and need to change its proportions or margin width:
- Unlock your guides by navigating to View > Guides > Lock Guides (uncheck) or pressing Ctrl + Alt + ; (Windows) or Cmd + Option + ; (macOS).
- Select the guides you wish to modify.
- Navigate to View > Guides > Release Guides or press Ctrl + Alt + 5 (Windows) or Cmd + Option + 5 (macOS).
- The guides immediately revert to standard editable vector paths.
- Open the Transform Panel (Window > Transform) to adjust coordinates, change dimensions, or re-run Object > Path > Split Into Grid… with updated gutter values.
- When satisfied with the new geometry, select the paths and press Ctrl + 5 (Windows) or Cmd + 5 (macOS) to turn them back into locked guides.
Workspace Snapping Hygiene: Avoiding Tool Conflicts
A frequent frustration for Illustrator users is cursor “jitter” or inability to snap to exact path points. This almost always occurs when multiple conflicting snapping engines are enabled at the same time.
Follow these rules for clean snapping:
- Do not run Snap to Grid and Smart Guides simultaneously: Snap to Grid forces anchor points to jump to the invisible preference grid increments (e.g., every
10px). Smart Guides (Ctrl + U/Cmd + U) forces anchor points to snap to vector geometry, centers, and path edges. When both are enabled, the cursor fights between the two engines. Turn off Snap to Grid when doing layout work with Smart Guides. - Isolate Guides on a Dedicated Layer: Create a top layer named
_GUIDESin your Layers Panel (Window > Layers). Place all custom guide grids on this layer. Double-click the layer thumbnail, uncheck Print, and lock the layer. This provides a hardware guarantee that no guide artifacts will ever render in client exports. - Turn Off Snap to Pixel for Print & Vector Marks: If you are working on print branding or non-pixel graphics, make sure View > Snap to Pixel is turned off to prevent fractional coordinate rounding.
Common Mistakes
Mistake 1: Leaving Vector Grids as Renderable Paths
When using the Rectangular Grid Tool or Split Into Grid, forgetting to convert the paths to guides (Ctrl + 5 / Cmd + 5) leaves real vector strokes in your file. When you export an asset or send a file to print, those grid lines will physically appear across your design. Always convert layout frames into non-printing guides or place them on a designated non-printing layer.
Mistake 2: Hardcoding Fixed Margins Without Checking Artboard Aspect Ratios
Using arbitrary margins without calculating inner proportions creates irregular column widths with fractional pixels (e.g., 141.667px). Always calculate inner canvas width ($W - 2 \times \text{Margin}$) so that dividing by your column count leaves clean integer or half-pixel values.
Mistake 3: Forgetting to Lock Guides
Unlocked guides will move whenever you select multiple artwork elements with a marquee drag (Ctrl + A). Lock guides immediately after creating them using Ctrl + Alt + ; (Windows) or Cmd + Option + ; (macOS).
Frequently Asked Questions
How do I change the grid size in Adobe Illustrator?
To change the background document grid size, open Preferences by pressing Ctrl + K (Windows) or Cmd + K (macOS), click the Guides & Grid tab, and enter your desired dimensions into the Gridline every and Subdivisions fields. For example, set Gridline every to 100px and Subdivisions to 10 for a 10px vector drafting grid.
Why is my Illustrator grid not showing up?
If your grid is not visible after pressing Ctrl + ’ (Windows) or Cmd + ’ (macOS), check three things: (1) Ensure View > Show Grid is checked; (2) Verify that your active artboard does not have an opaque white background rectangle covering the canvas; (3) Check Preferences > Guides & Grid and make sure the grid color is not set to match your canvas background color.
How do I make Illustrator grid lines not print?
The default Document Grid (View > Show Grid) is purely an on-screen reference and will never print. If you drew a grid using the Rectangular Grid Tool or Split Into Grid, select the grid paths and press Ctrl + 5 (Windows) or Cmd + 5 (macOS) to convert them into non-printing guides, or move them to a layer configured with Print unchecked in Layer Options.
What is the difference between Snap to Grid and Smart Guides?
Snap to Grid aligns anchor points and object bounds strictly to the document preference grid lines (defined in Preferences > Guides & Grid). Smart Guides dynamically snaps elements to other vector objects, paths, midpoints, anchor coordinates, and angular alignments on your canvas. For layout design, Smart Guides is usually preferred over Snap to Grid.
How do I create a 12-column grid in Illustrator?
Draw a rectangle over your canvas matching your artboard width and height, use Object > Path > Offset Path… to apply an inner margin (e.g., -60px), then go to Object > Path > Split Into Grid…. Set Number of Columns to 12, enter your Gutter width (e.g., 20px), click OK, and press Ctrl + 5 (Windows) or Cmd + 5 (macOS) to convert the shapes into non-printing guide columns. For a full tutorial, see our dedicated guide on how to make a 12-column grid in Illustrator.
Can I make an isometric or diagonal grid in Illustrator?
Yes. Select a standard vector grid drawn with the Rectangular Grid Tool, open the Transform Panel (Window > Transform), rotate the grid by 45°, and adjust the vertical scale to 57.735% (or use Object > Transform > Shear with an angle of 30°). Once positioned, press Ctrl + 5 (Windows) or Cmd + 5 (macOS) to turn the isometric matrix into snapping guides.
How do I hide or turn off the grid in Illustrator?
To hide the background document grid, press Ctrl + ’ (Windows) or Cmd + ’ (macOS) or navigate to View > Hide Grid. To hide custom vector guide grids, press Ctrl + ; (Windows) or Cmd + ; (macOS) or select View > Guides > Hide Guides.
Next Step
Explore How to Create Layout Grids in Adobe Illustrator for advanced multi-artboard modular and baseline typography grid systems, or discover The Logo Grid Blueprint to master circular and golden-ratio geometric construction grids.
Table of Contents
Recommended Tools
GridMaster
Create precise, professional vector layouts in seconds. GridMaster generates column, modular, baseline, and composition grids in Illustrator.
ColorLens
Generate palettes, check WCAG contrast, extract image colors, and export specification sheets directly inside Adobe Illustrator with ColorLens.
Logo Grider
Build logo grids, clear space rules, lockups, and minimum size systems in seconds. Logo Grider is a powerful Illustrator panel for logo designers.
Identity Assets
Bold Brand Guidelines Template
A high-performance landscape layout template for InDesign, Figma, and Illustrator. Deliver agency-level brand style guides to your clients.
Free Brand Guidelines Template
A clean brand guidelines template fully editable in Adobe Illustrator and InDesign. Ideal for freelancers and agencies organizing brand rules.
Ultimate Brand Guidelines Template
The ultimate 36-page professional brand guidelines template for Adobe Illustrator, InDesign, and Figma. Deliver agency-level brand books to clients.
Glossary Terms
Get New Branding Resources Every Week
Join over 10,000 identity designers who receive our latest curated tutorials, grid templates, checklists, and Illustrator workflow optimizations straight to their inbox.
Zero spam. Unsubscribe with a single click at any time.
Continue Reading
Baseline Grid in Illustrator: How to Align Typography and Vertical Rhythm
Master typographic baseline grids in Adobe Illustrator. Learn leading math, Preferences configuration, and Area Type first baseline offset alignment.
How to Make a 12-Column Grid in Adobe Illustrator (Manual Method & 1-Click Guides)
Learn how to set up a mathematically balanced 12-column layout grid in Adobe Illustrator. Step-by-step tutorial covering columns, gutters, margins, and guides.
Modular Grid vs. Column Grid: Which Layout Structure Fits Your Brand Guidelines?
Learn the structural differences between modular grids and column grids in Adobe Illustrator. Step-by-step setup, math rules, and brand guideline layout strategies.