
Baseline Grid in Illustrator: How to Align Typography and Vertical Rhythm

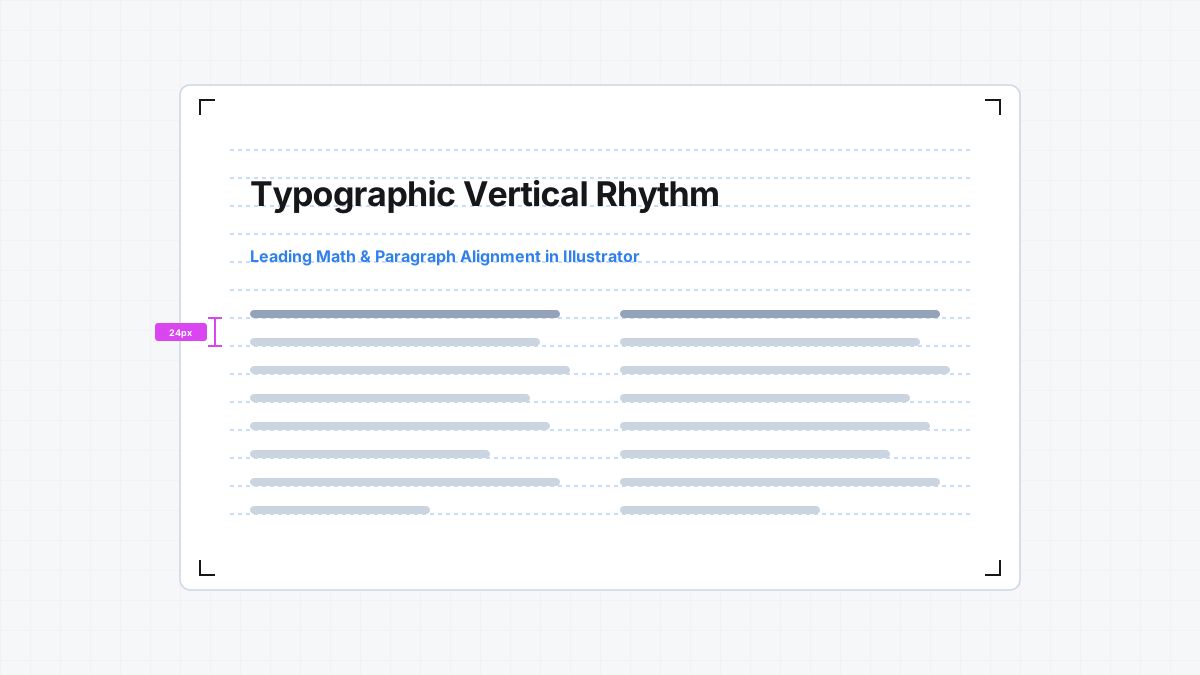
Quick Answer: To set up a baseline grid in Adobe Illustrator: (1) Determine your body copy line-height (leading), such as 10pt font size with 14pt leading; (2) Open Edit > Preferences > Guides & Grid (Windows) or Illustrator > Settings > Guides & Grid (macOS), set Gridline every to your leading value (e.g., 14pt or 24px), and set Subdivisions to 1; (3) Press Ctrl + ’ (Windows) or Cmd + ’ (macOS) to show the grid; (4) Select your text box, go to Type > Area Type Options…, and change First Baseline: Offset from “Ascent” to “Leading”.
Workflow Note
Configuring manual document preferences works well for single-page artwork. When designing multi-page brand guideline books, brochures, or complex modular spreads with multiple text columns, GridMaster generates custom column, modular, and baseline guide layers directly over your active artboard with zero preference conflicts. If you need a complete production layout system for client deliverables, explore the Ultimate Brand Guidelines Template.
Why Illustrator Handles Baseline Grids Differently Than InDesign
Designers transitioning from Adobe InDesign often search for an “Align to Baseline Grid” button in Illustrator’s Paragraph panel. In InDesign, the baseline grid is a native paragraph-level constraint that automatically snaps individual lines of text to an underlying vertical increment, regardless of where the text frame sits on the page.
Adobe Illustrator does not have a paragraph-level baseline snap toggle. Instead, vertical rhythm in Illustrator is achieved through coordinate geometry:
- Global Document Grid Alignment: Configuring the document preference grid to match your body copy leading (such as
14pt). - Area Type Frame Insets: Configuring the First Baseline Offset in the Area Type Options dialog so the first line of text begins precisely one leading increment below the frame’s top anchor.
- Multiples of Leading for Hierarchy: Setting headlines, subheadings, and block quotes to exact double or half-steps of your base leading.
When these three factors align, all typography across multiple columns and artboards locks into a unified, harmonious vertical rhythm.
Step 1: Establish Your Typographic Leading
Before opening Illustrator preferences, establish the base vertical increment for your layout system. In editorial and brand design, this unit is your body text line-height (leading).
Defining the Base Leading Interval
Select a standard font size and leading pairing for your primary body copy. Common proportional pairings include:
- Compact Editorial / Print Books:
9ptfont size with12ptleading (12pt baseline grid). - Standard Brand Guidelines / Reports:
10ptfont size with14ptleading (14pt baseline grid). - Digital Presentations / 16:9 Slides:
16pxfont size with24pxleading (24px baseline grid). - Large Format Display / Posters:
18ptfont size with26ptleading (26pt baseline grid).
Your base leading value becomes the master interval for your entire document baseline grid.
Harmonizing Headlines and Subheads to the Base Grid
To keep larger headlines and smaller captions aligned with body text across neighboring columns, set their line-heights and paragraph margins to clean multiples or half-steps of your base leading.
Practical Hierarchy Scale Example (Using a 14pt Base Grid):
| Hierarchy Level | Font Size | Leading Value | Baseline Span | Space Below Paragraph |
|---|---|---|---|---|
| Headline (H1) | 28pt | 28pt | 2 grid lines (28pt) | 14pt (1 line) |
| Section Title (H2) | 20pt | 28pt | 2 grid lines (28pt) | 14pt (1 line) |
| Subhead (H3) | 14pt | 21pt (or 28pt) | 1.5 or 2 grid lines | 7pt (half line) or 14pt |
| Body Copy | 10pt | 14pt | 1 grid line (14pt) | 14pt (1 line) |
| Captions / Footers | 8pt | 14pt (or 7pt) | 1 line or half-line | 7pt (half line) |
By adhering strictly to multiples and half-steps of 14pt, every paragraph start and end aligns across adjacent text columns.
Step 2: Configure Document Baseline Preferences
Once your leading interval is established, configure Illustrator’s background grid to display baseline lines at that exact frequency.
Setting Preferences > Guides & Grid
- Open the Preferences window:
- Windows: Press Ctrl + K or go to Edit > Preferences > Guides & Grid…
- macOS: Press Cmd + K or go to Illustrator > Settings > Guides & Grid…
- Locate the Grid section:
- Color: Select a subtle color such as Light Blue (
#2F80ED) or Custom Medium Gray (#CBD5E1) so grid lines do not distract from type contrast. - Style: Choose Lines (preferred for continuous baselines) or Dots.
- Gridline every: Enter your base leading value including the unit of measurement (for example, type
14 ptor24 px). - Subdivisions: Set this to
1.
- Color: Select a subtle color such as Light Blue (
- Click OK.
- Press Ctrl + ’ (Windows) or Cmd + ’ (macOS) to make the baseline grid visible on your canvas.
[!NOTE] Setting Subdivisions to
1is critical. If subdivisions are set to4or8, Illustrator draws multiple minor sub-lines between each leading track, creating visual clutter that obscures your actual baselines.
Step 3: Configure Area Type Options (The Missing Step)
The most common reason designers struggle with baseline alignment in Illustrator is the First Baseline Offset setting inside the text frame.
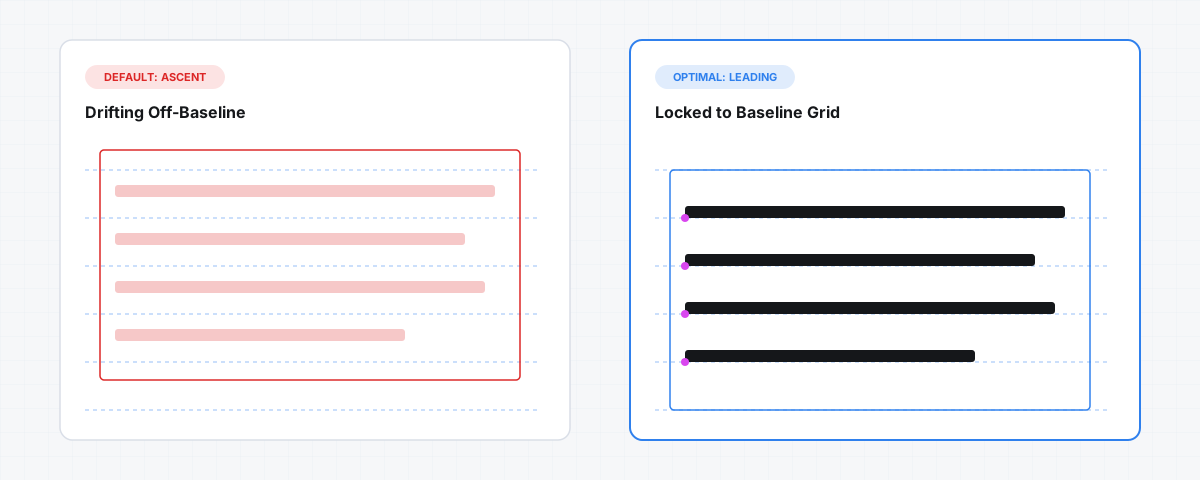
By default, Illustrator sets a text frame’s first baseline to Ascent. This calculates the distance from the top edge of the text box to the first line based on the font’s tallest ascender height. Because ascender heights vary across typefaces, the text lines float arbitrarily between your baseline grid tracks.
Changing First Baseline Offset from Ascent to Leading
To lock your text to the baseline grid:
- Select your Area Type text box using the Selection Tool (V).
- Navigate to Type > Area Type Options… in the top menu.
- In the lower-left portion of the dialog, locate the First Baseline section:
- Click the Offset dropdown menu (default is “Ascent”).
- Change the selection to Leading.
- Check the Preview box to observe the shift in real time.
- Click OK.
With Offset set to Leading, the baseline of your first line of text will sit exactly one full line of leading below the top anchor point of the text frame.
Setting Up Multi-Column Text Frames
If your layout uses multiple columns within a single text frame:
- With the text box selected, return to Type > Area Type Options…
- Under the Columns section:
- Set Number to your desired column count (e.g.,
2or3). - Set Gutter to a clean multiple of your layout grid (e.g.,
20pxor5mm).
- Set Number to your desired column count (e.g.,
- Under the Rows section:
- Keep Rows set to
1unless you are creating a structured matrix.
- Keep Rows set to
- Click OK.
Step 4: Aligning Text Blocks and Snapping Anchors
Now that the document grid and text frames are configured, align the text frame bounding box to the artboard grid.
- Open the Transform Panel (Window > Transform).
- Set the reference proxy point to the Top-Left Corner.
- Verify that the Y Coordinate of your text frame sits on an exact multiple of your baseline leading interval. For example, if your top page margin is
56pt(4 lines on a 14pt grid), set $Y = 56\text{pt}$. - Enable point snapping: Go to View > Snap to Point (check) and verify that View > Snap to Grid is active when placing frames.
- Move secondary text columns or sidebar callout boxes to snap to the horizontal baseline tracks.
Because both the frame position ($Y$) and the inner text offset are locked to multiples of your leading, body copy across all columns will share identical baseline coordinates.
Common Baseline Grid Mistakes in Illustrator
Mistake 1: Leaving First Baseline Offset on “Ascent”
When set to Ascent, typing in different fonts (such as switching from Helvetica to Garamond) alters the vertical start position of the text, causing column baselines to drift out of sync. Always set First Baseline Offset to Leading.
Mistake 2: Using Arbitrary Paragraph Spacing (Space After)
Entering non-grid values in the Paragraph panel (such as 10pt space after on a 14pt leading system) permanently breaks the baseline rhythm for all subsequent paragraphs. Set Space Before or Space After strictly to multiples of your base leading (e.g., 14pt, 28pt, or 7pt for half-line spacing).
Mistake 3: Setting Subdivisions Higher Than 1
Leaving subdivisions at the default value of 8 turns your baseline grid into a dense graph paper mesh. Set Subdivisions: 1 in Preferences > Guides & Grid so each visible line represents exactly one line-height.
Mistake 4: Mixing Point and Pixel Measurements Without Unit Lock
If your document units are set to Millimeters (mm) or Inches (in), entering leading values in Points (pt) can introduce rounding discrepancies over long pages. Set your document ruler units to Points or Pixels (File > Document Setup > Units) when working heavily with typographic systems.
Frequently Asked Questions
Does Adobe Illustrator have a native baseline grid like InDesign?
No. Illustrator does not have an automated paragraph-level “Align to Baseline Grid” switch. However, you can achieve the exact same vertical alignment by setting Preferences > Guides & Grid to your leading value and setting Type > Area Type Options > First Baseline: Leading.
How do I change the baseline grid color in Illustrator?
Open Preferences with Ctrl + K (Windows) or Cmd + K (macOS), navigate to the Guides & Grid tab, click the color swatch in the Grid section, and pick your preferred hue. Light blue, soft cyan, or medium gray work best for readability.
How do I choose my baseline grid interval?
Set your master grid interval equal to your body text line-height (such as 14pt). All headings, subtitles, and vertical margins should then be set to integer or half-steps (such as 21pt or 28pt).
Why does my text not align to the top of the text frame?
Illustrator defaults to an “Ascent” baseline offset, which places the first line based on font ascenders. Open Type > Area Type Options… and change First Baseline: Offset to Leading or Cap Height to control the exact vertical positioning.
How do I turn on or hide the baseline grid in Illustrator?
Press Ctrl + ’ (Windows) or Cmd + ’ (macOS) to toggle the document grid on or off, or go to View > Show Grid / View > Hide Grid.
How do I keep headlines aligned with body copy baselines?
Set your headline leading to an exact multiple of the body text leading. If body leading is 14pt, set your headline leading to 28pt (2 grid lines) or 42pt (3 grid lines), and set paragraph spacing below the headline to 14pt.
Next Step
Learn How to Make a Grid in Adobe Illustrator for column and modular layout grids, or explore How to Create Layout Grids in Illustrator to combine column structures with baseline typography systems.
Table of Contents
Recommended Tools
GridMaster
Create precise, professional vector layouts in seconds. GridMaster generates column, modular, baseline, and composition grids in Illustrator.
ColorLens
Generate palettes, check WCAG contrast, extract image colors, and export specification sheets directly inside Adobe Illustrator with ColorLens.
Logo Grider
Build logo grids, clear space rules, lockups, and minimum size systems in seconds. Logo Grider is a powerful Illustrator panel for logo designers.
Identity Assets
Bold Brand Guidelines Template
A high-performance landscape layout template for InDesign, Figma, and Illustrator. Deliver agency-level brand style guides to your clients.
Free Brand Guidelines Template
A clean brand guidelines template fully editable in Adobe Illustrator and InDesign. Ideal for freelancers and agencies organizing brand rules.
Ultimate Brand Guidelines Template
The ultimate 36-page professional brand guidelines template for Adobe Illustrator, InDesign, and Figma. Deliver agency-level brand books to clients.
Glossary Terms
Get New Branding Resources Every Week
Join over 10,000 identity designers who receive our latest curated tutorials, grid templates, checklists, and Illustrator workflow optimizations straight to their inbox.
Zero spam. Unsubscribe with a single click at any time.
Continue Reading
How to Make a Grid in Adobe Illustrator: 3 Practical Methods (Document, Guide & Vector Grids)
Learn how to make and customize grids in Adobe Illustrator. Step-by-step tutorial covering document background grids, layout column guides, and vector meshes.
How to Create Layout Grids in Adobe Illustrator: Column, Modular & Baseline Systems
Master Illustrator layout grids. A complete technical guide covering 12-column grids, modular design, baseline grids, grid lines, and GridMaster automation.
How to Make a 12-Column Grid in Adobe Illustrator (Manual Method & 1-Click Guides)
Learn how to set up a mathematically balanced 12-column layout grid in Adobe Illustrator. Step-by-step tutorial covering columns, gutters, margins, and guides.