
How to Make a 12-Column Grid in Adobe Illustrator (Manual Method & 1-Click Guides)

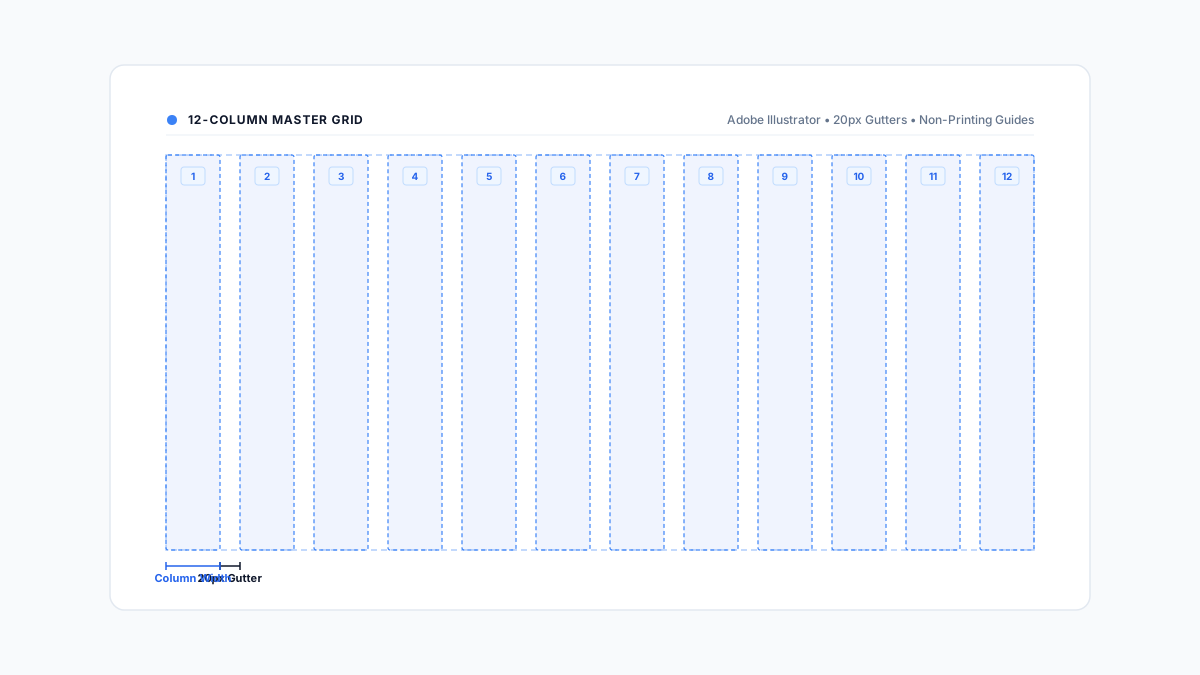
Quick Answer: To make a 12-column grid in Adobe Illustrator, draw a rectangle matching your artboard width minus your outer margins. With the rectangle selected, navigate to Object > Path > Split Into Grid…, set the column Number to 12, enter your desired Gutter width (such as 20px or 5mm), and click OK. Finally, press Ctrl + 5 (Windows) or Cmd + 5 (macOS) to convert the resulting 12 vector rectangles into non-printing guides.
Workflow Note
Manual grid construction gives you total control over anchor points and gutter coordinates. However, calculating column fractions and rebuilding guides across dozens of artboards or brand guideline spreads consumes valuable production time. The GridMaster panel extension automates multi-artboard 12-column systems, modular matrices, and typographic baseline guides natively inside Illustrator in seconds. To present your layout standards to clients, document your grid rules in our Ultimate Brand Guidelines Template.
1. Why the 12-Column Grid is the Industry Standard
Whether you are designing a 32-page corporate brand guideline book, packaging collateral, or digital landing page mockups, the 12-column layout grid is the most versatile structural system in visual design.
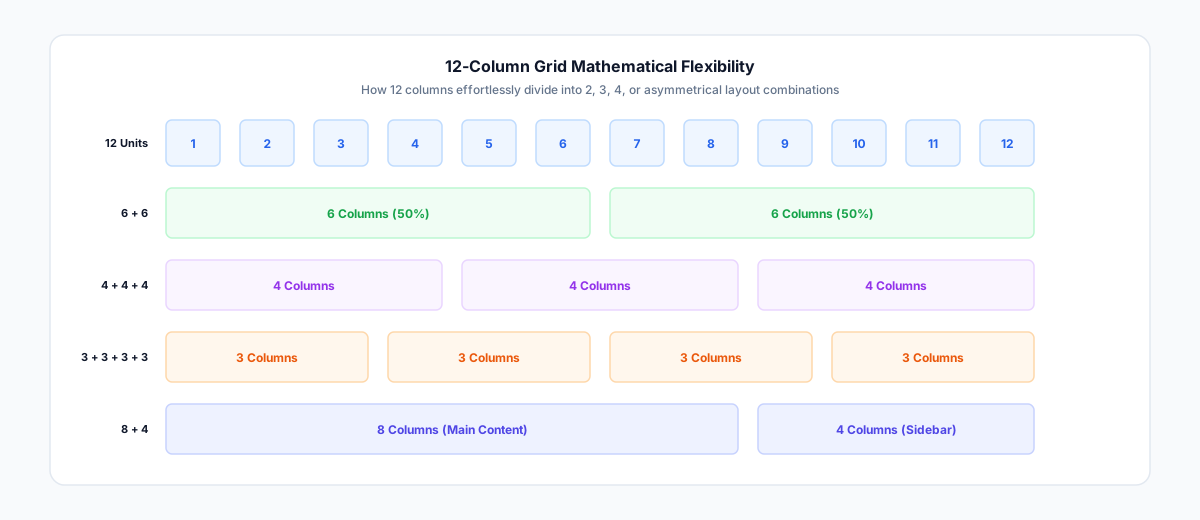
The mathematical reason is simple: the number 12 is divisible by 2, 3, 4, and 6. This mathematical flexibility allows a single master grid to support multiple symmetrical and asymmetrical column spans simultaneously:
- 2-Column Spans: Two 6-column blocks (ideal for 50/50 editorial spreads or comparison tables).
- 3-Column Spans: Three 4-column blocks (ideal for feature callouts and portfolio thumbnails).
- 4-Column Spans: Four 3-column blocks (ideal for product cards or data tables).
- Asymmetrical Spans: An 8-column main content area paired with a 4-column sidebar.
Without a strict grid, multi-page brand books and brochures quickly suffer from visual drift: text boxes end up with unequal margins, image frames misalign across artboards, and developers face frustrating spacing ambiguities during web handoff.
2. Standard 12-Column Grid Specifications
Before drawing paths in Illustrator, select column, gutter, and margin proportions that match your media format. A common mistake is using identical gutter widths for print and digital screens.
| Media Format | Artboard Size | Margins (Left/Right) | Columns | Gutter Width | Live Column Width |
|---|---|---|---|---|---|
| Desktop Web / UI | $1920 \times 1080\text{ px}$ | $260\text{ px}$ ($1400\text{ px}$ container) | 12 | $24\text{ px}$ | $94.67\text{ px}$ |
| Compact Web / Laptop | $1440 \times 900\text{ px}$ | $120\text{ px}$ ($1200\text{ px}$ container) | 12 | $20\text{ px}$ | $81.67\text{ px}$ |
| Print Brand Book (A4 Landscape) | $297 \times 210\text{ mm}$ | $20\text{ mm}$ ($257\text{ mm}$ live area) | 12 | $5\text{ mm}$ | $16.83\text{ mm}$ |
| Print Presentation (US Letter) | $11 \times 8.5\text{ in}$ | $0.75\text{ in}$ ($9.5\text{ in}$ live area) | 12 | $0.1875\text{ in}$ | $0.62\text{ in}$ |
Rule of thumb: For digital screens, keep gutter widths divisible by 4 or 8 (such as 16px, 24px, or 32px) to conform to standard digital design token systems.
3. Step-by-Step: How to Build a 12-Column Grid in Illustrator
Follow this 5-step manual workflow to construct a production-ready 12-column guide system on your active artboard.
Step 1: Define the Live Area Rectangle
Your live area represents the active canvas boundary where typography, images, and brand marks sit, bounded by your outer margins.
- Select your target artboard by clicking it with the Selection Tool (V).
- Press M to activate the Rectangle Tool.
- Click once on the canvas to open the Rectangle dialog box.
- Calculate the width: $\text{Live Width} = \text{Artboard Width} - (\text{Left Margin} + \text{Right Margin})$. For example, on a $1920\text{px}$ canvas with $260\text{px}$ side margins, enter
1400pxfor Width and1080pxfor Height (or your desired vertical margin height). - Open the Align Panel (Window > Align), set Align To: Artboard, and click Horizontal Align Center and Vertical Align Center.
Step 2: Split the Rectangle into 12 Columns
Instead of manually calculating individual column widths with a calculator, use Illustrator’s built-in path division engine:
- Keep your live area rectangle selected.
- In the top application menu, go to Object > Path > Split Into Grid….
- Under the Columns section on the right side of the dialog:
- Set Number to
12. - In the Gutter field, enter your desired spacing (e.g.,
24 px). - Check the Preview box in the bottom-left corner to inspect the spacing. Illustrator automatically calculates the exact column width down to three decimal places.
- Set Number to
- Leave the Rows section untouched unless you are creating a modular matrix.
- Click OK. Illustrator splits the single rectangle into 12 independent vector shapes.
Step 3: Convert Vector Paths to Non-Printing Guides
At this stage, your columns exist as standard vector shapes. If left as paths, they will render on export, print onto physical paper, and clutter your artwork layers.
- With all 12 column rectangles selected, navigate to View > Guides > Make Guides, or press the keyboard shortcut Ctrl + 5 (Windows) / Cmd + 5 (macOS).
- The solid vector bounding paths immediately convert into thin, non-printing guide lines.
- Test your guide visibility by pressing Ctrl + ; (Windows) or Cmd + ; (macOS) to toggle guides on and off.
Step 4: Lock Guides to Prevent Accidental Displacement
When designing fast, dragging a marquee selection over text blocks often accidentally catches guide lines, throwing off your alignment.
- Navigate to View > Guides > Lock Guides, or use the shortcut Ctrl + Alt + ; (Windows) / Cmd + Option + ; (macOS).
- Guides will now remain fixed in space, allowing you to snap anchors and bounding boxes freely without shifting column coordinates.
Step 5: Configure Smart Guides for Sub-Pixel Snapping
To ensure vector shapes and text frames snap to your column edges accurately:
- Turn on Smart Guides by pressing Ctrl + U (Windows) or Cmd + U (macOS).
- Open Preferences via Ctrl + K (Windows) or Cmd + K (macOS) and click Smart Guides.
- Ensure Alignment Guides and Object Highlighting are checked, and set Snapping Tolerance to
4 ptor4 pxfor crisp, accurate cursor attachment.
4. Common 12-Column Grid Mistakes in Illustrator
Avoid these four common production traps:
1. The Sub-Pixel Rounding Trap
When dividing canvas widths by 12, column widths frequently result in repeating decimals (such as 94.6667px). If you enter rounded integer values manually into the Transform panel, your twelfth column will fall short of the margin by 2 to 4 pixels. Always allow Object > Path > Split Into Grid to calculate the internal math natively.
2. Confusing Document Grid with Layout Guides
Illustrator features a built-in background grid (View > Show Grid / Ctrl + '). That tool is a document-wide preference matrix designed for vector icon drafting. It does not support margins, column counts, or gutters. Layout design requires vector guides tied to specific artboard coordinates.
3. Placing Guides on Active Artwork Layers
If you build guides directly on content layers, locking layers will lock your guides, and hiding artwork layers will hide your layout boundaries. Create a dedicated top layer named Guides so you can lock, hide, or show your grid independently.
4. Unequal Multi-Artboard Guide Distribution
When copying guides to adjacent artboards manually using copy-paste, guides easily offset by a few pixels if the artboard origins differ. Use Edit > Paste in Place (Ctrl + Shift + V / Cmd + Shift + V) to maintain absolute coordinates across consecutive artboard spreads.
5. Frequently Asked Questions
What is the best gutter width for a 12-column web grid?
For desktop screens ($1440\text{px}$ to $1920\text{px}$), gutter widths between 20px and 32px are standard. A 24px gutter is the most popular choice because it cleanly divides into the 8-point spatial system used in modern design systems.
Can I make a 12-column grid with modular horizontal rows?
Yes. In the Object > Path > Split Into Grid… dialog, configure the Rows section in addition to the Columns section. Enter a row count (such as 6 or 8) and specify a horizontal gutter matching your typographic leading to create a modular layout matrix.
How do I turn my 12-column guides back into editable vector paths?
Select your artboard, unlock your guides (Ctrl + Alt + ; / Cmd + Option + ;), select the guide lines, and navigate to View > Guides > Release Guides (Ctrl + Alt + 5 / Cmd + Option + 5).
Why do my guides shift when I resize an artboard?
By default, Illustrator guides are anchored to canvas coordinates rather than dynamic artboard bounds. When you adjust artboard dimensions in the Artboard Tool (Shift + O), guides remain static unless you select both the artboard and the guides simultaneously.
How do I duplicate my 12-column grid across 20 artboards in Illustrator?
Select all 12 column guides on Artboard 1, press Ctrl + C (or Cmd + C), switch to the next artboard, and press Ctrl + Shift + Alt + V (or Cmd + Shift + Option + V) to execute Paste on All Artboards.
6. Next Steps: Client Guidelines & Production Standards
Establishing an agency-grade 12-column layout grid elevates client deliverables from arbitrary vector layouts into cohesive, structured design systems.
Once your layout system is established, import your column parameters and margins into our Ultimate Brand Guidelines Template. It includes pre-structured vector pages designed specifically to showcase your layout grid math, column hierarchies, and clearspace rules to clients and development teams.
Table of Contents
Recommended Tools
GridMaster
Create precise, professional vector layouts in seconds. GridMaster generates column, modular, baseline, and composition grids in Illustrator.
ColorLens
Generate palettes, check WCAG contrast, extract image colors, and export specification sheets directly inside Adobe Illustrator with ColorLens.
Logo Grider
Build logo grids, clear space rules, lockups, and minimum size systems in seconds. Logo Grider is a powerful Illustrator panel for logo designers.
Identity Assets
Bold Brand Guidelines Template
A high-performance landscape layout template for InDesign, Figma, and Illustrator. Deliver agency-level brand style guides to your clients.
Free Brand Guidelines Template
A clean brand guidelines template fully editable in Adobe Illustrator and InDesign. Ideal for freelancers and agencies organizing brand rules.
Ultimate Brand Guidelines Template
The ultimate 36-page professional brand guidelines template for Adobe Illustrator, InDesign, and Figma. Deliver agency-level brand books to clients.
Glossary Terms
Get New Branding Resources Every Week
Join over 10,000 identity designers who receive our latest curated tutorials, grid templates, checklists, and Illustrator workflow optimizations straight to their inbox.
Zero spam. Unsubscribe with a single click at any time.
Continue Reading
Modular Grid vs. Column Grid: Which Layout Structure Fits Your Brand Guidelines?
Learn the structural differences between modular grids and column grids in Adobe Illustrator. Step-by-step setup, math rules, and brand guideline layout strategies.
How to Make a Grid in Adobe Illustrator: 3 Practical Methods (Document, Guide & Vector Grids)
Learn how to make and customize grids in Adobe Illustrator. Step-by-step tutorial covering document background grids, layout column guides, and vector meshes.
Baseline Grid in Illustrator: How to Align Typography and Vertical Rhythm
Master typographic baseline grids in Adobe Illustrator. Learn leading math, Preferences configuration, and Area Type first baseline offset alignment.