
Golden Ratio vs. Rule of Thirds in Illustrator: Setup Math & Composition Grids

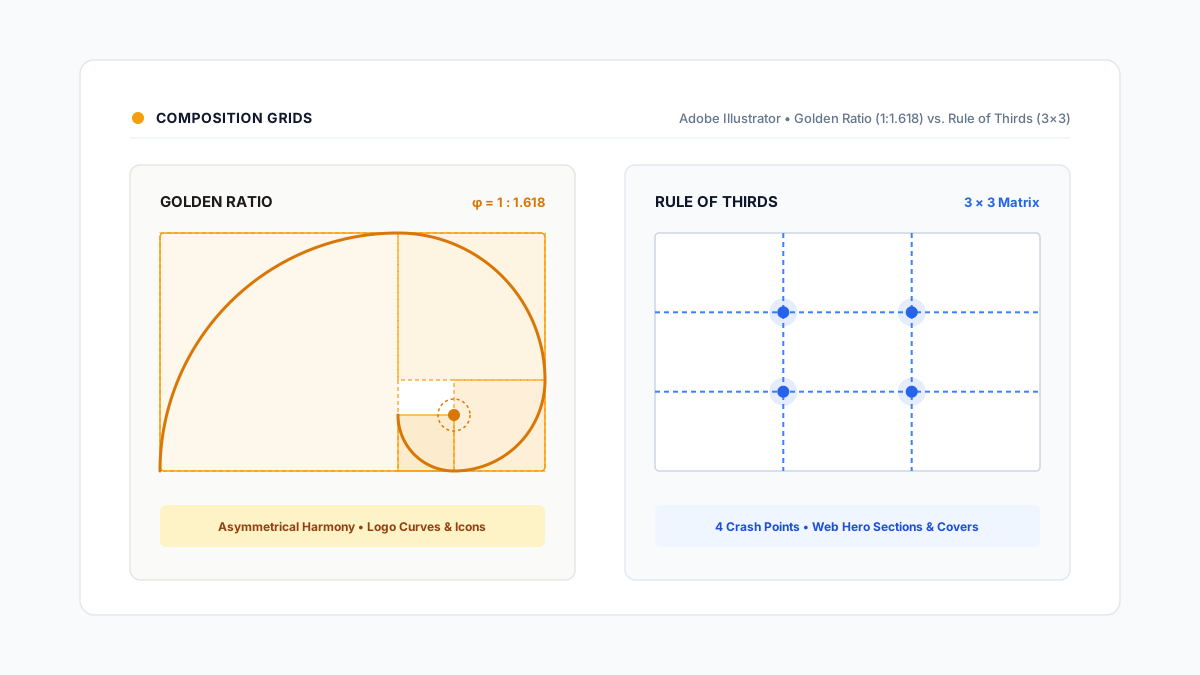
Quick Answer: The Golden Ratio ($1:1.618$) divides layout space into asymmetric, organic proportions derived from the Fibonacci sequence, ideal for geometric logo marks, icon curves, and focal hierarchy. The Rule of Thirds ($3\times3$) divides the canvas into nine equal rectangles ($33.3% \times 33.3%$), creating four rapid focal intersection crash points best suited for photography framing, editorial covers, and web hero compositions.
Workflow Note
Constructing golden spirals and multi-ratio guide armatures manually in Adobe Illustrator requires repeated transform calculations, arc tool snapping, and manual guide conversion (Cmd + 5 / Ctrl + 5). The GridMaster panel extension automates Rule of Thirds matrices, Golden Ratio overlays, Golden Spirals, and diagonal dynamic symmetry guides directly onto your active artboard in one click. To standardize these compositional systems for client handoff, document your grid rules with our Ultimate Brand Guidelines Template.
1. Composition Systems: Phi vs. Equal Thirds
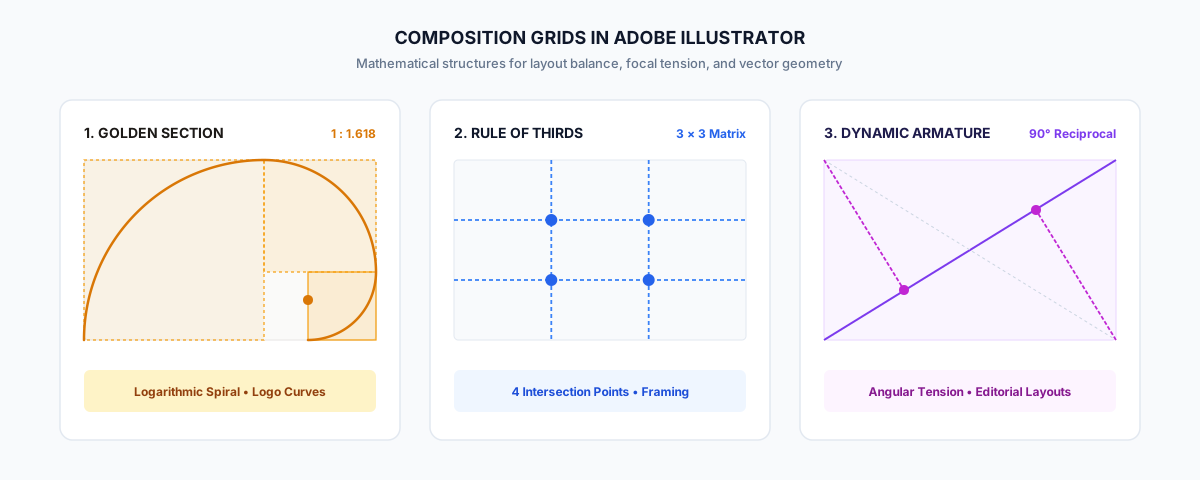
Vector layout design relies on mathematical frameworks to guide the human eye. Placing artwork arbitrarily across an artboard introduces subconscious visual dissonance. Both the Golden Ratio and the Rule of Thirds solve this problem, but they execute different geometric logic.
The Golden Ratio (The Divine Proportion $\phi$)
The Golden Ratio, symbolized by the Greek letter Phi ($\phi$), occurs when a line is divided into two parts such that:
$$\frac{A + B}{A} = \frac{A}{B} \approx 1.6180339887$$
In two-dimensional vector composition:
- Proportional Scaling: Multiplying or dividing any shape’s width or height by $1.618$ creates a naturally balanced sister element.
- Fibonacci Progression: Nested squares built on the Fibonacci sequence ($1, 1, 2, 3, 5, 8, 13, 21, 34, 55, 89$) create the classic logarithmic spiral.
- The Golden Cut: Dividing a canvas into $61.8%$ and $38.2%$ sections establishes an asymmetrical anchor that avoids rigid, artificial symmetry while remaining completely harmonized.
- Best Applied To: Brand marks, identity symbols, vector emblem curvatures, typographic scale ladders, and luxury brand assets.
The Rule of Thirds (The $3 \times 3$ Equal Matrix)
The Rule of Thirds is a pragmatic simplification of dynamic composition. It divides an artboard horizontally and vertically into three equal bands:
- Division Formula: Each column width is exactly $\text{Width} / 3$ ($33.33%$), and each row height is $\text{Height} / 3$ ($33.33%$).
- The Four Power Points: The four coordinates where the two vertical and two horizontal lines intersect are called crash points or focal power points.
- Ocular Behavior: Eye-tracking studies demonstrate that viewers scan these four intersection points before looking at the visual center of an artboard. Placing your primary focal anchor (such as a call-to-action, a product hero shot, or a headline lead-in) on an intersection point commands immediate attention.
- Best Applied To: Digital advertising banners, web hero headers, photography crops, social media carousels, and editorial poster designs.
2. Decision Matrix: When to Apply Each System
Choosing between Phi and equal thirds depends on whether your deliverable demands organic curvature harmony or structured structural balance:
| Deliverable Type | Recommended System | Proportional Target | Primary Advantage |
|---|---|---|---|
| Vector Logo Marks & Emblems | Golden Ratio (Phi) | Nested Fibonacci circles ($1, 2, 3, 5, 8, 13$) | Produces seamless tangential curvature and mathematically cohesive brand symbols. |
| Brand Guideline Covers | Golden Cut ($61.8% / 38.2%$) | Horizontal or vertical division | Anchors the primary title block against negative white space with natural authority. |
| Website Hero Sections & Landings | Rule of Thirds ($3\times3$) | Power point at top-right or top-left | Aligns copy blocks on one vertical third while dedicating two thirds to product imagery. |
| Packaging & Label Fronts | Dynamic Symmetry / Phi | Reciprocal diagonal armature | Controls reading cadence between product mark, brand claim, and mandatory legal weights. |
| Campaign Social Media Cards | Rule of Thirds | Lower third horizontal line | Keeps focal headlines legible across mobile viewports without crowding image centers. |
| Typographic Scale Hierarchy | Golden Ratio Scale ($1.618$) | Point sizes scaled by $\times 1.618$ | Establishes high-contrast, dramatic hierarchy between display titles and body paragraphs. |
3. Step-by-Step: Constructing a Golden Ratio Grid in Adobe Illustrator
Follow this manual workflow to create a precise Golden Ratio vector grid and spiral on any Illustrator artboard.
Step 1: Set Your Base Artboard Dimensions
- Open Illustrator and create an artboard sized to a Fibonacci dimension (for example,
1618 pxwidth $\times$1000 pxheight, or809 px$\times$500 px). - Press
Cmd + R(macOS) orCtrl + R(Windows) to enable rulers.
Step 2: Draw the Primary Phi Square
- Select the Rectangle Tool (
M). - Click once on the artboard and enter the height of your artboard for both width and height (for a
1000 pxtall artboard, create a1000 px$\times$1000 pxsquare). - Align this square flush to the left edge of your artboard using the Align panel (
Window > Alignset to Align to Artboard).
Step 3: Subdivide the Remaining Golden Section
- The remaining space on the right measures exactly $618\text{ px} \times 1000\text{ px}$ (the golden rectangle).
- Inside this sub-rectangle, draw a square measuring $618\text{ px} \times 618\text{ px}$ and snap it to the top.
- In the remaining lower rectangle, draw the next square ($382\text{ px} \times 382\text{ px}$) snapped to the right.
- Continue this inward spiral progression down through sizes $236\text{ px}$, $146\text{ px}$, and $90\text{ px}$.
Step 4: Draw the Golden Spiral Arcs
- Select the Arc Tool (nested under the Line Segment Tool
\). - Inside each square, click and drag an arc from corner to opposing diagonal corner.
- Hold
Shiftto constrain the arc to a true quarter-circle. PressFwhile dragging to flip the arc concavity if needed. - Join the endpoints using
Cmd + J/Ctrl + Jto form a continuous vector logarithmic spiral.
Step 5: Convert Shapes to Native Illustrator Guides
- Select all your constructed rectangles and spiral curves (
Cmd + A/Ctrl + Aon that layer). - Right-click and choose Make Guides, or press the shortcut
Cmd + 5(macOS) /Ctrl + 5(Windows). - Lock your guides so they cannot be accidentally shifted while designing:
Cmd + Option + ;(macOS) orCtrl + Alt + ;(Windows).
4. Step-by-Step: Constructing a Rule of Thirds Matrix
Building an exact $3\times3$ grid takes under 30 seconds using Illustrator’s native path splitting engine.
+-------------------+-------------------+-------------------+
|                   |                   |                   |
|         (Crash 1) |         (Crash 2) |                   |
|             +     |             +     |                   |
+-------------------+-------------------+-------------------+
|                   |                   |                   |
|         (Crash 3) |         (Crash 4) |                   |
|             +     |             +     |                   |
+-------------------+-------------------+-------------------+
|                   |                   |                   |
|                   |                   |                   |
+-------------------+-------------------+-------------------+
Step 1: Generate an Artboard Boundary Rectangle
- Select the Rectangle Tool (
M). - Click once on the artboard and enter the exact dimensions of your canvas (e.g.,
1920 px$\times$1080 px). - Open the Align panel, set Align to: Artboard, and click Horizontal Align Center and Vertical Align Center.
Step 2: Split Into a $3 \times 3$ Matrix
- With the rectangle selected, navigate to the menu bar:
Object > Path > Split Into Grid… - In the dialog box:
- Rows: Set
Numberto3. SetGutterto0 px. - Columns: Set
Numberto3. SetGutterto0 px.
- Rows: Set
- Check the Preview checkbox to verify that your artboard is cleanly divided into nine equal segments.
- Click OK.
Step 3: Transform Lines Into Construction Guides
- Select the nine generated rectangles.
- Press
Cmd + 5(macOS) orCtrl + 5(Windows) to convert them into native cyan vector guides. - The internal intersecting lines now delineate your four focal power points.
5. Common Vector Precision Mistakes in Illustrator
When working with composition grids, minor software settings can throw off your mathematical alignment:
1. “Snap to Pixel” Distorting Phi Curves
If Snap to Pixel (View > Snap to Pixel) is enabled on non-integer artboard divisions, Illustrator will force vector anchor points to the nearest whole pixel coordinate. Because golden ratio calculations yield irrational fractions (e.g., $618.0339…$), pixel snapping introduces incremental mathematical drift.
- Solution: Disable Snap to Pixel when designing logo marks or golden spirals. Enable Snap to Point (
View > Snap to Point) instead.
2. Stroke Width Affecting Alignment Bounds
By default, Illustrator calculates object dimensions based on geometric path centers, ignoring outer stroke weights. If you draw a guide box with a 4 pt stroke aligned to the center, your visual bounding box is 2 pt larger on all sides than your intended mathematical coordinate.
- Solution: In the Transform panel menu (
Window > Transform), toggle Use Preview Bounds to ensure bounding boxes include total stroke thickness, or always work with strokes set to0 pt(fill only) prior to pressingCmd + 5.
3. Accidentally Transforming Guides with Artwork
If guides remain unlocked, using the selection tool (V) or Marquee selection will select and translate your composition guides along with your vector artwork.
- Solution: Always lock guides immediately after creation via
View > Guides > Lock Guides(Cmd + Option + ;/Ctrl + Alt + ;), or place all guides onto a dedicated, locked “Guides & Armatures” top layer.
6. Automating Composition Overlays with GridMaster
Constructing Golden Spirals, Fibonacci curves, and Rule of Thirds matrices manually for every new client deliverable is time-consuming. When juggling 20+ artboards inside a comprehensive brand guidelines deck, manual reproduction is prone to guide drift.
The GridMaster panel extension integrates directly into Adobe Illustrator to streamline this entire workflow:
- 1-Click Composition Guides: Toggle instant Rule of Thirds, Golden Ratio, Golden Spiral, and Diagonal Armature overlays on any active artboard.
- Multi-Artboard Propagation: Apply composition systems across all artboards simultaneously without copy-pasting.
- Dynamic Orientation: Automatically detects whether each artboard is horizontal, vertical, or square, orienting the Fibonacci spiral toward your chosen corner quadrant.
- Zero Mathematical Drift: Generates true 64-bit floating-point guide paths that convert natively into locked Illustrator guides.
Frequently Asked Questions
What is the exact difference between the Golden Ratio and the Rule of Thirds?
The Golden Ratio uses an asymmetrical proportion factor of $1:1.618$ ($61.8%$ to $38.2%$), creating an organic spiral or division based on natural growth patterns. The Rule of Thirds is a symmetrical grid that divides an area into three equal parts ($33.3%$ each). The Rule of Thirds places focal elements closer to the canvas edges than the Golden Ratio.
How do I type mathematical formulas directly into Illustrator’s Transform panel?
Illustrator’s input fields support standard math operators. In the Transform panel’s W: or H: fields, you can type / 1.618 to calculate the golden section, or / 3 to calculate a one-third subdivision. Press Enter to apply.
Can I flip the direction of a Golden Spiral in Illustrator?
Yes. Select the spiral path, select the Reflect Tool (O), press Enter to open the Reflect dialog, and choose either Horizontal or Vertical axis reflection. Alternatively, GridMaster includes one-click quadrant flip buttons for golden spiral orientation.
Why do my guides disappear when I press Cmd + 5?
If your guides vanish after pressing Cmd + 5 (Ctrl + 5), guides visibility is likely toggled off. Press Cmd + ; (macOS) or Ctrl + ; (Windows) to toggle guide visibility on.
Is the Rule of Thirds accurate enough for vector logo design?
The Rule of Thirds is primarily a layout and framing tool, not a geometric construction tool. For logo marks, icon sets, and letterforms, the Golden Ratio or a modular isometric grid is superior because it provides harmonic radius curves and tangential circular geometry.
How do I document my composition grid rules for a client brand manual?
Include a dedicated “Grid Systems & Clearspace” page in your brand book. Show the active composition guides overlaid at $30%$ opacity on top of your primary brand mark and marketing layouts, specifying exact margin values, column rhythms, and focal anchor points using our Ultimate Brand Guidelines Template.
Table of Contents
Recommended Tools
GridMaster
Create precise, professional vector layouts in seconds. GridMaster generates column, modular, baseline, and composition grids in Illustrator.
ColorLens
Generate palettes, check WCAG contrast, extract image colors, and export specification sheets directly inside Adobe Illustrator with ColorLens.
Logo Grider
Build logo grids, clear space rules, lockups, and minimum size systems in seconds. Logo Grider is a powerful Illustrator panel for logo designers.
Identity Assets
Bold Brand Guidelines Template
A high-performance landscape layout template for InDesign, Figma, and Illustrator. Deliver agency-level brand style guides to your clients.
Free Brand Guidelines Template
A clean brand guidelines template fully editable in Adobe Illustrator and InDesign. Ideal for freelancers and agencies organizing brand rules.
Ultimate Brand Guidelines Template
The ultimate 36-page professional brand guidelines template for Adobe Illustrator, InDesign, and Figma. Deliver agency-level brand books to clients.
Glossary Terms
Get New Branding Resources Every Week
Join over 10,000 identity designers who receive our latest curated tutorials, grid templates, checklists, and Illustrator workflow optimizations straight to their inbox.
Zero spam. Unsubscribe with a single click at any time.
Continue Reading
How to Make a 12-Column Grid in Adobe Illustrator (Manual Method & 1-Click Guides)
Learn how to set up a mathematically balanced 12-column layout grid in Adobe Illustrator. Step-by-step tutorial covering columns, gutters, margins, and guides.
How to Make a Grid in Adobe Illustrator: 3 Practical Methods (Document, Guide & Vector Grids)
Learn how to make and customize grids in Adobe Illustrator. Step-by-step tutorial covering document background grids, layout column guides, and vector meshes.
Modular Grid vs. Column Grid: Which Layout Structure Fits Your Brand Guidelines?
Learn the structural differences between modular grids and column grids in Adobe Illustrator. Step-by-step setup, math rules, and brand guideline layout strategies.